One of the woes of having a tiny apartment is not having room for pumpkins in the fall.
I live vicariously through my mom when we visit - as soon as its September, mom has out all of her pumpkin accouterments.  And believe me, there are several.
I did want to put some autumn goodness in our space, so I started brainstorming. Whatever I did needed to be something noticeable but not over the top, not take up a lot of space, and most importantly be cheap.
This definitely met all three requirements.


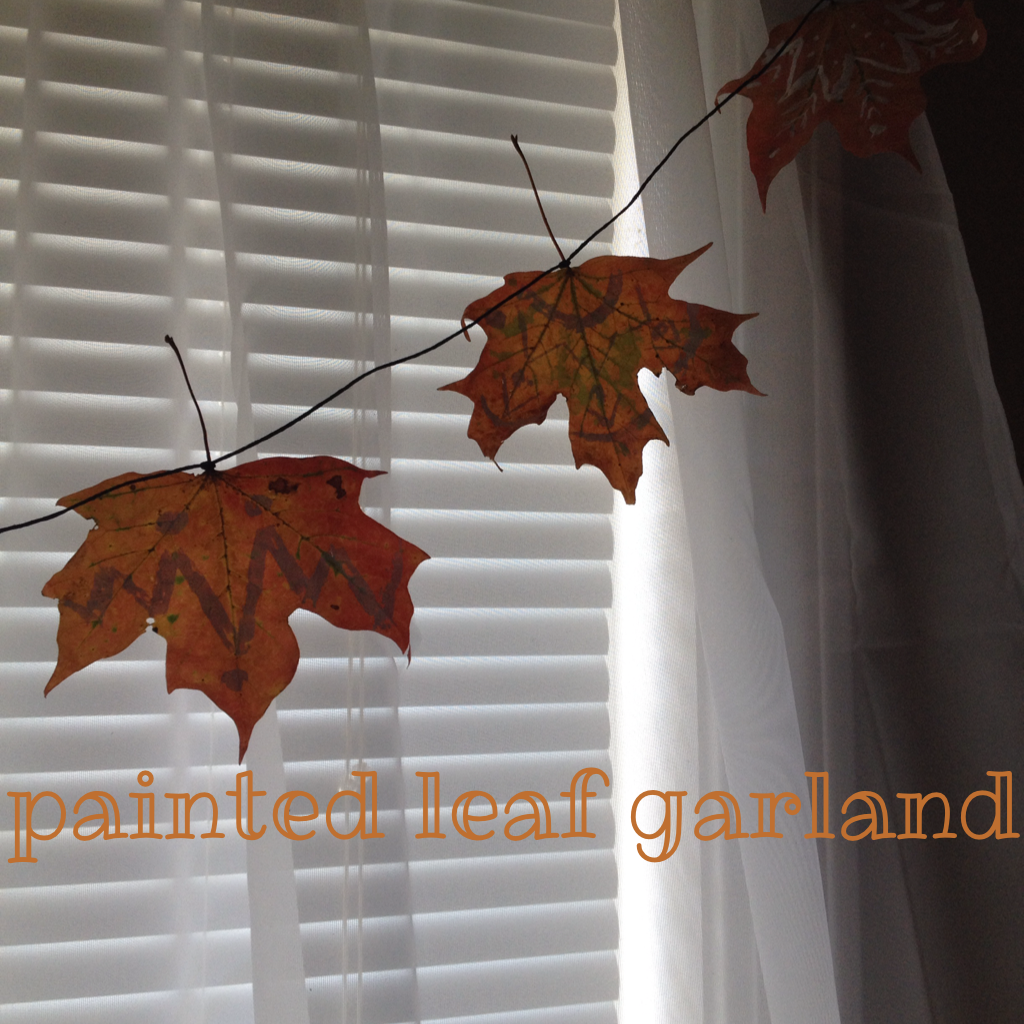
I collected the leaves, so that part was free.  I already had the cord from jewelry making.  All I had to buy was the paint pen, making the grand total of this project 4.50.


I collected the leaves outside one of the building on campus - so yeah, I was that girl.  All I did then was doodle on them with the paint pen, tie them to the cord, and hang it up.


I plan on making many more of these as the leaves continue to fall.  You can string up a bunch together for a more dramatic look, add beads and ribbons; whatever you want, really.  You could write on the leaves rather than doodle... The possibilities are pretty much endless.


This has at least partially assuaged my autumn decorating urge :) What do you use to decorate for fall?


On a recent Hobby Lobby excursion, I found a pack of canvases and beginner's acryllic paints on sale. I'm not an artist by any stretch of the imagination, but I had an idea of something I wanted to make for our home, so I took advantage of the reduced prices.


Caleb is really close to his grandparents, and something his grandmother would always remind him of is to "enjoy the journey." Through the years we've learned just how important this lesson is - from working towards and waiting to hear about jobs, to taking the time to be thankful for the opportunity to attend school, even through waiting impatiently for our wedding day.  We only have a fixed amount of time on earth, and who knows how long it will be, so we had better enjoy every moment; even the ones we see as something that we want to pass quickly to get to the next stage.


I knew that I wanted to do the "flower halo" like the one on my blog logo.  I drew a circle on the canvas with a pencil and wrote the words in the center.  After that I just went nuts with color and different flowers I could dream up, following the circle and interconnecting all of them.  I'm really pleased with how it turned out.


This added a much needed pop of color to our walls, and a great reminder to take every day at a time, enjoying every moment.


I've been loving coconut-flavored stuff lately.  And since its on its way out, being replaced with pumpkin (also a love of mine), I'm taking advantage of the last few days of coconut bliss.
This is a super easy recipe that doesn't even really need a tutorial... I just added a few flourishes of my own that I'll tell you about :)

what you need:
dark chocolate chips
1 tb. shredded coconut
coffee
coconut coffee creamer
coffee ice cubes


Don't you hate when the ice cubes melt in your iced coffee and make it all watery?  The lovely ladies of treasures and travels found a solution by poring brewed coffee into ice molds to cool your brew and keep it from getting watery! 

Take a handful of chocolate chips and a tiny bit of shredded coconut and blend it in a food processor while brewing a pot of coffee.  Try to get the coconut as finely chopped as possible.  There will inevitably be a little that settles in the bottom of your glass, but getting it finely chopped makes it less sludgy.


Once your coffee is done brewing, I put the whole carafe in the fridge for a few minutes.  I like my iced coffee cold, not lukewarm, so pouring it in freshly brewed isn't my favorite.

After it's chilled for a bit, spoon your chocolate coconut mixture into the bottom of your glass, add your coffee ice cubes, and pour the coffee over, stirring as you go.  Add your coconut coffee creamer (I used Coffee Mate Caramel and Coconut, based on girl scout cookies, natch) and enjoy!


Autumn is my favorite season, and the foods that accompany the leaves changing is one of the big reasons.  Mulled wine, hot cider, and pie make my heart do a happy dance.
Lately I've been slightly obsessed with pumpkin, both the smell and the fruit (go to Bath and Body Works RIGHT NOW and get some sweet cinnamon pumpkin lotion. Thank me later.)  I'm also a big fan of soup because it's fairly easy, you can make a ton of it at once, and it's just cozy. I love cozy.
So when I found myself with a butternut squash, a can of pumpkin, and an inordinate amount of free time, I decided to BS my way into some soup.  I didn't use a recipe for this, and it turned out pretty awesome, if I do say so myself.


What you'll need:
A butternut squash (you can get a whole one or the kind that's already cubed; if you get a whole one you will only need half of it)
a can of unsweetened pumpkin
half a can of cream of chicken or 3 cups chicken broth
spices to taste (we liked sea salt and nutmeg)

What you'll do:
If you have chicken broth, pour 3 cups in your pot and simmer on low.  If you don't (like I didn't), you can fake it by diluting half a cup of cream of chicken in 3 cups hot water.  If you're doing that, turn up the heat a bit more and stir occasionally.


While that's heating, cut up your squash (or, if you got lucky, toss your pre-cubed squash in the food processor).  Turn it on and chop it up until its almost a paste - the same consistency as your canned pumpkin.  Throw some spices in there while its chopping for the yums.


Once everything is chopped up, add it slowly to your chicken broth, stirring to mix it all together. Leave it on low heat (about a 3) until everything is mixed smoothly, then leave it on simmer until ready to serve, adding spices to taste.


If you got a whole squash, you can roast the seeds like you would pumpkin seeds for an easy, protein-y snack.  Just put them in a flat pan, add whatever spices you like (garlic for salty, cinnamon for sweet are my favorites), and roast at 350 for about 12 minutes.  That's it!


This is my first foray into homemade fall food, and I'm thrilled it went so well! I can't wait to try all my other fall recipes in the coming months.


I meant to make sun tea all summer long, and since my summer ends today (sob), I made some this last week as a sort of last hurrah.
It turned out delicious!
Sun tea is fun because a) it looks really pretty on your stoop while its steeping and b) you can put whatever the heck you want in there.  You can make it all year long (except in freezing temperatures, that probably isn't the best idea), but it seems summery to me.


For this batch I used two bags of peppermint tea, a tablespoon of honey, and cut up strawberries. I put all the ingredients in a jar and left it on the porch in direct sunlight for about 4 hours.


This was a perfect refreshing drink when I wanted something a little jazzier than water without tons of added sugar.  Tell me what different combinations you try!


When we were planning the wedding, one thing I was sure of was that I didn't want a traditional guest book.  I knew that if there was just a book on a table, half the guests wouldn't sign it in the first place, and at the end of the day it would go in a box.  I wanted something that we could display in our home.
So instead of a guest book, we had our guests sign either the matting of one of our framed engagement photos, or a big wooden W.  We have both of them hanging up where we can read the sweet notes from our friends, and they look pretty good :)


If a guest book is the way you want to go, go for it!  I have friends that made really cute ones on Shutterfly full of pictures of them and their friends that they display on shelves in their homes.  But if you want to get more artsy with it, go with a picture, your initial, or even a painting that means something to you (that you don't mind having people write on, of course).  Weddings are so personalized nowadays, you can really make your guestbook whatever you want!


Our plan all along was to make our cake topper... but originally, Caleb was going to make two birds out of wood and burn "We do" onto them.  But then he got a promotion and I got two jobs and time ran away from us, and there we were Thursday night with no cake topper and no time to carve one.
So, I dug through mom's scrapbooking supplies, came up with some cardstock, a metallic sharpie, and a few paper clips, and got to work.


I started by finding a bird template online and looking at it as a guide while I freehanded it onto the cardstock.  I'm not the best artist, so there was a whole lot of erasing and redrawing before I was done.


I cut out 4 birds, and then unbent the paper clips halfway and taped them to the inside to make the bird's legs.  I rolled up tape and stuck it to the inside and taped another one of the birds there so that the tape wasn't visible from either side.
I wrote "we do" with the metallic sharpie after repeating the process with the other bird, and we had a cake topper!


This may not be an heirloom that you pass through the ages, but it's exactly what I wanted and light enough that you don't have to worry about it going through the cake!


It turned out wonderfully! And our bank account was happy :)


Don't worry, more of these are coming! Mom and I have DIY-ed our little hearts out and I am so proud of all that we've made!
This is one of our projects - we went and got pallets from a warehouse in town, and used white paint to make a sign that points guests towards our venue!  It's a farm that's kinda off the beaten path, so signs were a necessity.


We found some cute bird stencils in the crafts section and added those, since birds are our theme!
The best part of this is it was completely free - the pallets didn't cost anything, and the white paint we already had from painting the garage earlier in the summer.
If your wedding venue is difficult to find, these are a cute and cost-effective way of making sure your guests don't get lost!


I love the way rough stones look in jewelry. Probably because of my fantasy novel problem, where people run around with amulets and whatnot.  They make me feel magic.
What's not so magic is how difficult it is to find necklaces like this, and how expensive they are when you do find them. So, I made my own.


You can find a pretty good selection of reasonably priced crystal pendants on etsy, but I actually got these at Dollywood. Super random.
This isn't really a tutorial, per se, but it's how I wire wrapped the stones to make pendants out of them.  It's an intuitive process and really easy to get the hang of.

What you need:
gemstones (I like to get the "points", they're easier to wrap.)
24 gauge jewelry wire (here)
cord (here)
jewelry pliers (here)
jewelry wire cutters (here)

Basically, all you need to do is wrap the jewelry wire around the crystal and follow the natural shape of it so that it will be held securely.  Don't forget to make a loop at the top for the cord!
I wrapped these two different ways:


This one is simple - the stone was thicker at the top, so I wrapped around the thinner part right below the thicker, bringing it up to make the loop.  You'll want to loop the wire in on itself, almost like you're tying a knot.  That's why having the right gauge is so important; you want it thick enough to bend and stay, but not so thick that you can't maneuver it.


This one was more arrowhead-shaped, so I wrapped it horizontally as well as across, leaving some extra at the top for the loop.
Wire wrapping is pretty much trial and error - you just have to take into account what you want the pendant to look like, whether that will work with its natural shape, and make sure that the way you wrap it is secure.


I love these necklaces and I know I'll be wearing them every day :) They're a great unique piece to wear with a plain t-shirt and dress it up!


As the wedding draws closer (3 weeks!!! I can't believe it!) I've been slowly starting to move my stuff into Caleb's apartment and make it my space as well as his.
I love the way pennant banners look, and that you can customize them to say whatever you want.  The bedroom was looking a little bare, so I decided to make it my first decorating project.
At first I was going to buy a pennant, but then I saw some supplies at Hobby Lobby and figured I could make one for much cheaper!
Here's what you'll need:

...and Modge Podge, which didn't make it into the picture.
First, cut your sheet of cardstock into triangles.  I had square cards so I was able to freehand it, just cutting down the corners.  If you have larger sheets, you'll probably want to make a template and trace triangles onto the cardstock before you cut.
Cut as many as you'll need for how long you want your banner - mine wasn't super long, but I plan on making a bigger one for the window in the living room.
Take the Modge Podge and draw a line on the top of your triangle. Press the ribbon to it so that it sticks.


My ribbon was perforated, so I added a dot of glue on the top and spread it for extra hold.
Repeat with all your triangles and let it dry, and you're done!  
I added words to mine - its a cute way to show a verse or song lyric that you like (I like it better than wall decals).
I used Song of Songs 6:3 - "I am my beloved's and my beloved is mine."
I'm so excited to keep making projects to decorate our tiny space!


It seems that most of my cooking adventures that actually succeed are accidents.
Take these cookies, for example.
I meant to make sea salt chocolate chip cookies from this recipe.
I didn't necessarily want to add peanut butter, so I subbed in a cup of chocolate pudding.  And I didn't have butter, so I subbed apple sauce.
But the most interesting sub of all was that I didn't have a cookie sheet, so I cooked them in a skillet.


They actually turned out delicious, though they aren't the prettiest things in the world.

What you need:
1.5 cups flour
3/4 tsp baking soda
3/4 tsp baking powder
.5 cups apple sauce
1 cup chocolate pudding
sea salt (sprinkle it in to taste)
.3 cups granulated sugar
coconut oil
1 tbs greek yogurt
as many chocolate chips as you can stuff in there

Mix all your dry ingredients and set aside.  Mix pudding, apple sauce, and yogurt and add dry ingredients slowly, mixing thoroughly together - the texture of the dough is going to be kinda fluffy and sticky. Heat up a skillet and use coconut oil to grease the bottom and cook like you would pancakes - flip it over more often than you think you should so that the bottom doesn't get burned.  I flipped these about 3 times a cookie, just to make sure it cooked mostly through.
These are basically cookie pancakes, and they are yumm-o.  They'll probably be a little doughy in the middle, but I like my cookies that way, so I'm cool with it :)

yum!


I have been on the hunt for a nice fringed kimono for a long time. It's taken so long because the things are freaking expensive. Why are such impractical pieces of clothing the ones that cost the most? It is a conundrum that will haunt me for the rest of my days.
As most of my stories begin, I was searching Google for "cheap fringed kimonos." A link popped up for a DIY from The Merrythought, which is a super cute blog that is definitely now on my reading list!
And I was like "WHY DID I NOT THINK OF THIS."
This DIY is adapted from theirs.  The biggest difference is that I couldn't find a robe that I liked (and felt uber-skeeved sifting through the lingerie section of Goodwill), so I altered a top instead.

Here's what you need:


If you're super crafty, you can use a sewing machine, but alas, I am not.  My hand stitched kimono is holding up just fine.

Here's what you do:

1. Cute your sheer top down the center.  Go slow; since you're altering a top and don't have extra fabric lying around you want to make sure you don't cut a crooked line.

*cat optional.

2. Hem where you just cut.  This step is tempting to skip, but if you do your top will fray. I'm all about shabby chic, but falling apart is where I draw the line. Pin about a half inch of fabric back and sew down the line.  You may want to iron it out before you stitch so that it lays flat.


3. Once you're all hemmed up, it's time to add the fringe!  Lay your top down flat, so that the whole bottom hem is in one line.  Line up your fringe and trim it to fit.  I used a yard almost exactly.


4. Stitch your fringe in place.  Most fringe that you buy from sewing stores will have little loops across the top specifically for sewing it onto something - THESE LOOPS ARE YOUR FRIEND. USE THEM. It takes longer than just stitching right through, but the hold will be stronger and look better.

That's it!  You just saved yourself about 75 big ones!


I'm obsessed with this thing; I think I've worn it every day since I made it.  Look for a post later this week on a few different ways to wear your little bit of craftyness!